Below is a list of all available arc creation methods. The following sections cover these methods in detail. There is also a quick reference sheet of the arc creation methods.
Note:
The object selected for tangency cannot be a parabola, hyperbola, or spline. (However, one of these objects can be selected for tangency to a complete circle.)
For all arc creation methods, you can establish precise values for the radius or diameter by keying the value into the text field in the dialog bar and pressing <Enter> immediately after creating the arc.
To create an arc using this method:
-
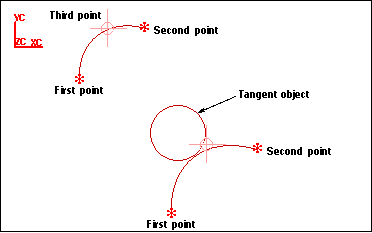
Define two points. The points may be cursor locations, control points, or values established by keying numbers into the dialog bar and pressing <Enter>.
An arc is displayed by dragging. Its endpoints are the two defined points.
-
Define a third point or select a tangent object (other than a parabola, hyperbola, or spline).
To create an arc using this method:
-
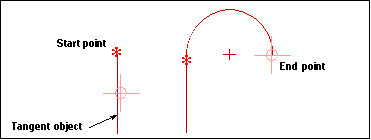
Define the start point. This may be a cursor location, control points, or values established by keying numbers into the dialog bar and pressing <Enter>.
-
Select a tangent object (other than a parabola, hyperbola, or spline). An arc rubberbands starting at the point and tangent to the selected object.
-
Define the end point.
This method is similar to the previous one, but is intended to let you define tangency at the endpoints of an object. If the start point is an endpoint of the tangent object, the arc will come off the end of the selected object and be tangent to it.
To create an arc using this method:
-
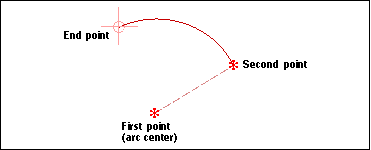
Choose the Center, Start, End button to turn the option ON.
-
Define the center point. This may be a cursor location, control points, or values established by keying numbers into the dialog bar and pressing <Enter>.
-
Define the second point. This establishes the radius of the arc and the start angle. An arc is rubberbanded, in a counterclockwise direction from the second point.
-
When the desired arc is displayed, specify a cursor location, select limiting geometry, or enter an end angle in the dialog bar. (Remember that you can get the complement of the previewed arc by pressing MB2 for Alternate Solution.)