|
Overview |
Options |
Related Topics |
When you export a User Defined Feature, all relevant Knowledge Fusion rules in the work part are saved with the UDF and become part of the UDF definition. The Knowledge Fusion rules that are brought into the receiving part when the UDF is instantiated also become available to you.
User Defined Features is one of the ways by which a user realizes re-use of KF rules.
KF provides a class, ug_udfs, which lets you instantiate a UDF. Input to this class is the UDF name, an optional library, and a list of parameters and references to be resolved. Additionally, there are also a number of strategies to choose from by which the UDF can be positioned in the receiving part.
It is useful to create a DFA class wrapper for a UDF in which the UDF and its required parameters and geometric references can be documented and so described.
You can create UDFs with PMIs data. See the PMIs Help for details.
Suppose you would like to create a boss feature in Knowledge Fusion. Since there is no system class for a boss feature, you can define a UDF from an extruded sketch that simulates a boss. You adopt the sketch and the extrusion into Knowledge Fusion before inserting the UDF so you can access their parameters when the UDF is instantiated into the receiving part file.
Note:
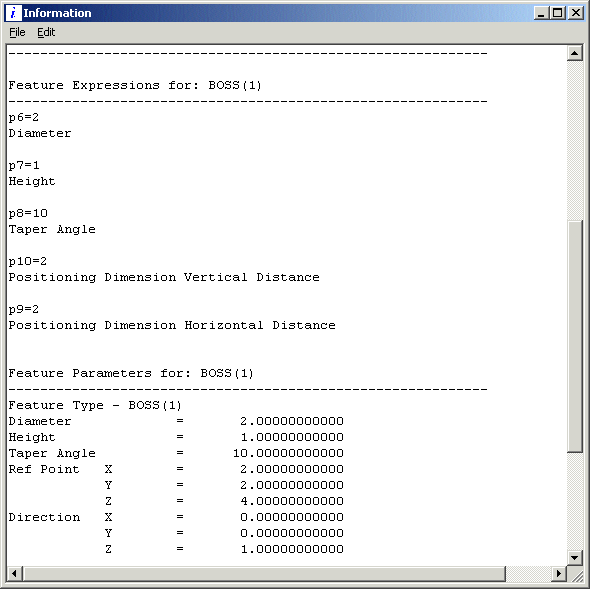
If a feature you want to adopt has a corresponding system class, an object of that class is created. If the adopted feature does not have a corresponding class, then an object of ug_feature class is created. In this case, expression rules are created for every expression associated with the feature. If the expression has a corresponding feature parameter, the feature parameter name is used for the name of the rule. Otherwise, the expression name is used for the rule name. For example, a boss that is located on a block face has 5 expressions associated with it. However, a boss has only 3 feature parameters: diameter, height, and taper angle. The other 2 expressions are dimensioning parameters for positioning the boss on the block face. So the resulting expression rule names would be diameter, height, taper_angle, p9, and p10. See the following figure.
This particular UDF has 4 external references and 3 input parameters. When you insert this UDF using the ug_udfs system class, the inputs would be:
|
Name; "boss"; Library; "test"; Parameters; {{diameter,2.0},{height,1.0},{taper_angle,0.0}}; References; {SOLID_face:,SOLID_edge:,SOLID_edge_0:,SOLID_edge_1:}; |
The references must be given in the same order as per the specification of the UDF.
The following figure shows the resulting object tree.

Notice that the KF rules that were in the UDF definition are children of the UDF feature. Also, notice that these rules are colored blue in the KF Navigator. This means that you can edit them. However, there is one restriction. If a rule is an input parameter to the UDF, the value that is specified in the Parameters input to the UDF is used for the rule value, no matter what you change the rule to. In our example, changing p3's value input or EXTRUDED_2's height or taper_angle inputs has no affect.
Since these rules are in the object tree, we can reference them in other rules. For instance, we might want to make sure that the size of the placement face, SOLID_face, is bigger than the boss diameter.
When you create a UDF through Knowledge Fusion, there is an option to indicate the desired direction of a geometric reference. You can specify an element in the reference list as a sub-list containing the following:
{reference, [point ()], [vector ()], [flip]}
Specifying a point causes the direction to be towards the point. For example, if you have an edge as a geometric reference, then the positive direction along the edge is towards the point.
If you specify a vector, then the positive direction with respect to the reference is the direction of the input vector.
If you specify flip, then the default direction of the geometric reference is reversed.
Geometric references can also be resolved based on the attribute name of an object. For example, if you named a face "MY_FACE" in the UDF definition, the system matches that face name in the receiving part if it exists.
When using sketch UDFs, it is frequently the case that you must supply a number of external references. Please note that in the general case you must offer additional information, within the list of "References", so that the sketch is oriented and located as desired. Failure to provide this information may result in obtaining the wrong result, which is manifested as the sketch "flipping" or being placed at the "wrong" location.
The following describes how the UDF sketch is processed plus some notes on the additional information you may specify in order to insure the desired result.
You must supply a plane on which to place the sketch. This is either a solid face or a datum plane. The plane normal is important since this plays a part in determining the sketch orientation on the plane.
When positioning a UDF sketch that requires the specification of external references the problem arises of which of the several possible positions, is the correct one. Determining a sketch UDF location requires two steps:
Copy the sketch from the UDF into the current part.
Use the dimensions that reference the external objects to determine the final sketch location.
The first step determines which of the possible positions to take. Step two then fixes the sketch at a location that preserves the position relative to the external objects.
You can then control which position to choose by instructing the UDF where to place the sketch (step one) by providing a "help" point that rests on the placement plane. The point you supply corresponds to the imaginary center point of a box that contains the UDF sketch. The location of this help point only needs to be accurate to the extent that it positions the sketch correctly. The user is only concerned with establishing the appropriate position relative to the external objects.
The point is specified as additional information to the placement plane prefixed by the key word as given below:
{placement_plane:, SKETCH_REF_POINT, Point(1,2,3)}
The orientation of the sketch on the placement plane is given by the normal to the plane and, either a horizontal or vertical axis; you should supply only one. You indicate the positive direction of the axis by supplying a reference vector. If you do not supply a vector, the system computes a default one based on the start/end point order of the axis specified.
For example in the list of "References" you may include a list that contains an instance plus a vector. For example:
{horizontal_axis:, vector(-1,0,0)}
Typically, positioning of the UDF is dependent on resolving geometric references. This is the conventional way to position a UDF. KF also offers orientation by reference frame, which we describe below.
If you have a UDF which needs a positioning dimension to position itself, you specify the useRpoMenu? attribute to be TRUE, then when you create the UDF through Knowledge Fusion, the Positioning dialog displays to position the UDF.
Positioning by reference frame assumes you are instantiating the UDF in a DFA file or through the Add Child Rule option in the Knowledge Fusion Navigation Tool. With this strategy, the positioning geometry is localized inside the UDF definition. Additionally, all the geometry inside the UDF is dependent directly on the reference frame that positions the UDF in the receiving part.
Positioning by reference frames is not the "normal" or conventional way for UDF instancing. However, it gives you some control similar to simple "mating conditions" (or may be used to do something similar to simple mating conditions, if desired).
For example, let's say we have a boss on the top face of a block. If we include both the boss and the block in the UDF definition, then we can position this UDF using the reference frame input parameter to the ug_udfs class. The resulting position and orientation of the UDF is a concatenation of the reference frame and the WCS of the UDF. So if the WCS of the UDF was at (1,2,3) and rotated about Z 30 degrees and you specified a reference frame at (1,2,3) with a Z rotation of 30 degrees, the final position of the block (if it was created at the WCS origin) would be (2,4,6) and rotated 60 degrees.
When instantiating a UDF using Modeling, a dialog is presented based on the input expressions and references required by the UDF definition. However, with the Knowledge Fusion class you can configure a customized dialog.
In Knowledge Fusion, each input parameter has a type. The types available are: Boolean, Integer, Number, Name, Point, String, Vector, List, Instance, User, and Any. For a UDF custom dialog, only the following types are supported: Boolean, Integer, Number, Name, Point, String, and Vector.
The input entry dialog for each parameter data type is listed in the following table.
|
KF Data Type |
NX Entry dialog |
|---|---|
|
Integer |
Integer input box, slider, or option menu |
|
Instance |
Uses the INPUT_PARAMETER list of the child instance. See Instance below. |
|
Number |
Number input box, slider, or option menu |
|
Name |
Name input box or option menu |
|
String |
String input box, option menu, or file selection box |
|
Boolean |
Toggle switch |
|
Point |
Point subfunction dialog |
|
Vector |
Vector subfunction dialog |
The UDF parameters are identified by a list attribute called "INPUT_PARAMETERS". It contains all the parameters that need to be added to the custom dialog or a single instance, which itself contains a list attribute named INPUT_PARAMETERS. If an instance is given in the INPUT_PARAMETERS list, it must be the only element in that list. If an instance is given, then that instance should also have a list attribute named INPUT_PARAMTERS, that is used to customize the UDF dialog. The order of the list is the order in which the parameters are presented in the dialog.
The parameter label for each NX dialog widget is specified by a string attribute, the name of which is the name of the parameter with the extension "_label". For example, if there is a parameter named "Integer:", the label is defined by an attribute named "Integer_Label:"
The INPUT_PAMAMETERS list can contain any combination of the following:
A string type that is converted into a label in the UDF dialog.
A name type that is converted into an input parameter in the UDF dialog,
The key word separator is converted into a separator bar in the UDF dialog.
An instance that contains it own INPUT_PARAMETERS list attribute. If used, it cannot be combined with the previous items.
The name types in the parameter list are the names of the parameters that the dialog manipulates.
|
|
|
(Integer Modifiable) P1: 5; (String) P1_label: "Integer Example"; |
|
|
|
(Number Modifiable) P1: 6.0; (String) P1_label: "Number Example"; |
|
|
|
(String Modifiable) P1: "this is a string"; (String) P1_label: "String Example"; |
|
|
|
(Name Modifiable) P1: my_name; (String) P1_label: "Name Example"; |
|
|
|
(Boolean Modifiable) P1: True; (String) P1_label: "Boolean Example"; |
|
|
|
(Point Modifiable) P1: ; (String) P1_label: "Point Example"; |
|
|
|
(Vector Modifiable) P1: ; (String) P1_label: "Vector Example"; |
Specifying an option list may restrict the values entered for a particular parameter. This produces a drop down list of values from which you must make a selection. The name of the list is the parameter name plus the "_Option" extension. The list must hold all the valid options for the parameter. The Knowledge Fusion types that are supported for the option widget are: Integer, Number, Name and String.
|
|
|
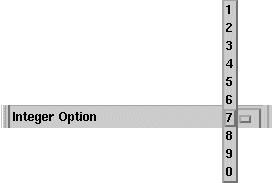
(Integer Modifiable) P1: 5; (String) P1_label: "Integer Option"; (List) P1_Option:{1,2,3,4,5,6,7,8,9,0}; |
|
|
|
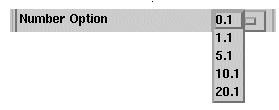
(Number Modifiable) P1: 0.1; (String) P1_label: "Number Option"; (List) P1_option:{0.1,1.1,5.1,10.1,20.1}; |
|
|
|
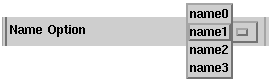
(Name Modifiable) P1: name1; (String) P1_label: "Name Option"; (List) P1_option:{name0,name1,name2,name3}; |
|
|
|
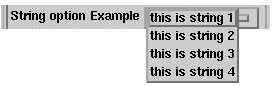
(String Modifiable) P1: "This is string 1"; (String) P1_label: "String Option Example"; (List) P1_option:{"this is string 1", "this is string 2", "this is string 3", "this is string 4"}; |
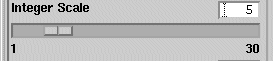
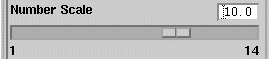
To create a Scale menu Widget for a parameter, the "_range" extension needs to be added to a list attribute, and this attribute needs to hold the lower and upper limits of the parameter. The Knowledge Fusion types that are supported for the scale widget are: Integer and Number.
|
|
|
(Integer Modifiable) P1: 5; (String) P1_label: "Integer Scale"; (list) P1_range: {1, 30}; |
|
|
|
(Number Modifiable) P1: 10.0; (String) P1_label: "Number Scale"; (list) P1_range: {1.0, 14.0}; |
A file selection dialog displays when you choose the select file option.
|
|
|
(String) filename: "abc.prt"; (String) P1_label: "Select File"; (List) P1_file_extension: {"*.prt"}; |
To tell the system to look into a child instance for parameters that need to be added to the custom dialog, place a solitary reference to the instance in the Input_Parameter list. This option cannot be combined with root-level parameters; the system can customize the dialog with root-level parameters or the input parameters found in a child, but not both. This is not recursive. For example, assume, that you have a DFA file that contains the following input parameters for UDF dialog customization:
 (number) Offset1:  0.75;
 (number) Offset2:  0.50;
The DFA file would also contain the following attribute:
(list) input_parameters: {Offset1, Offset2}; Assuming that you created an instance named "ABC" at root level of this DFA file, you would then create the following attribute at root level:
(list) input_parameters: {ABC:}; This would instruct the system to read the value of ABC:Input_Parameters: to customize the UDF dialog.
Elements in the INPUT_PARAMETERS list that are of string type or are references to string attributes become output parameters in the UDF dialog. In the example below, the volume entry in the input_parameters list would be an output parameter since it is an attribute of type string. Notice that length, width, and height in the input_parameters list are names, and so these become input parameters in the UDF custom dialog.
Every time a length, width, or height change occurs the volume changes.